Browsing all posts tagged how-to

Dustin and his wife recently uncovered an interesting limitation of my Monkey Album software: characters outside of the ISO-8859-1 (Latin 1) character set don't render properly. This comes as no surprise, seeing as I didn't design for Unicode. Being a rather egregious display error, I decided to set out and fix the problem. In the process, I learned quite a lot about Unicode, and how it affects web applications. This post will be the first of two detailing how to add Unicode support to a web application. I will only be exposing a tip of the Unicode iceberg in these posts. The ideas and practices behind Unicode support can (and do) fill the pages of many books. That said, let's jump in.

Brief Background

For the uninitiated, Unicode is a coded character set. That is, it maps a unique scalar value (a code point) to each character in a character set. ASCII is another example of a coded character set. Each character in a coded character set is intended to be encoded using a character encoding scheme. ISO-8859-1 is an example of a character encoding scheme.

It is important to note that ISO-8859-1 is the default encoding for documents on the web served via HTTP with a MIME type beginning with "text/". So, if you're not set up to specifically serve another encoding, your web pages are most likely using ISO-8859-1. This works just fine if you speak English or a subset of European languages. But because the ISO-8859-1 character encoding uses only 8 bits for its encoding scheme, it is limited to 256 possible characters. It turns out that 256 characters isn't enough for international text representation (the Chinese and Japanese languages come to mind). What can we do?

Thankfully, we have a solution in Unicode. A number of Unicode encoding schemes are available for us to use: UTF-7, UTF-8, UTF-16, and UTF-32. Each has its merits and detractors, but it turns out that UTF-8 is the preferred encoding of choice in the computing world (it's a nice trade off between space allocation and capability). As a bonus, UTF-8 works nicely with ASCII, which makes migrating English-based websites much easier.

Unfortunately, we have another major problem to deal with. All PHP releases (prior to the upcoming PHP 6) internally represent a character with 8-bits. That's right: PHP has no native support for international characters (yet)! This means that we have to be extra vigilant in our pursuit of internationalization support. So how do we do it?

Prepping Our PHP for Unicode

In order for our PHP application to properly display Unicode characters, we need to do some preparatory work. This involves setting the appropriate character encoding in a few places. We'll first set the encoding in the header:

header('Content-Type: text/html; charset=UTF-8');

Remember that the header() function must be called before we output any HTML, so it needs to appear early in the chain of events. Note also that the header call incorrectly labels the encoding as a 'charset,' making the naming conventions even more confusing.

We can also specify the encoding through the use of a meta tag (I recommend setting this even if you set the header):

<meta http-equiv="Content-Type" content="text/html; charset=UTF-8">

If you take this route, make sure this tag is placed near the top of the <head> element in your HTML (before your <title> element, in fact). Otherwise, the browser may select an incorrect encoding.

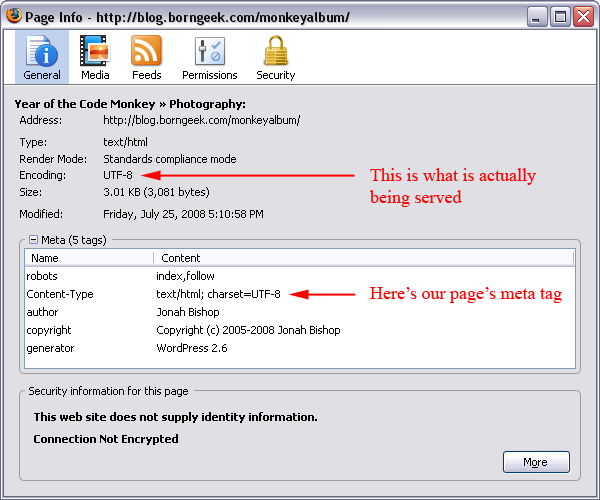
To verify that that the appropriate encoding is being used, you can use the View Page Info feature in Firefox (just right click the page and you'll see it in the context menu). Here's an example:

Page Info Dialog in Firefox Showing UTF-8 Encoding
Displaying Unicode Text

One of the primary functions that PHP provides to convert characters into their HTML entity equivalents is the aptly named htmlentities() function. However, since we're converting our application to support UTF-8, we don't need to make use of this function. Why is this? First, HTML entities are generally only understood by web browsers. By converting special characters into HTML entity equivalents, it becomes much harder to move data between the web application and other data sources (RSS feeds, for example). Second, and most importantly, UTF-8 allows us to display extended characters directly. To quote Harry Fuecks [PDF], with UTF-8 "we don't need no stinkin' entities." Instead, we should only worry about the "special five":

  • Ampersand (&)
  • Double Quote (")
  • Single Quote (')
  • Less Than (<)
  • Greater Than (>)

Thankfully, PHP gives us the htmlspecialchars() function to handle these five special characters. One very important thing to note is that this function allows you to specify the character encoding to use when parsing the supplied text. For example:

htmlspecialchars($incomingString, ENT_QUOTES, "UTF-8");

Specifying the character encoding is very important when using this function! Otherwise, you open yourself up to to a rather nasty cross-site-scripting vulnerability, something that even Google was susceptible to a while back. In short, the character encoding specified in your htmlspecialchars() call should match the encoding being served by the page.

What Next?

In the next article, I'll cover the following topics:

  • Prepping MySQL databases for Unicode
  • Accepting Unicode characters from the user
  • Potential PHP pitfalls
  • Useful resources (loads of helpful links)

As always, if you have suggestions or questions, feel free to post them.

While working on a Windows batch script earlier today, I ran across an interesting side effect of the call and exit commands. Let's take this simple example, which we'll name script_a.bat:

@echo off
SETLOCAL

call :function
cd %SOME_PATH%

goto :functionEnd
:function
    set foobar=1
    if "%foobar%" == "1" exit /B 1
    goto :EOF
:functionEnd

Unlike Bash, Windows batch files have no function capabilities. Clever hacks like the above can be used to fake out functions, but these hacks hide some subtle quirks. You see that exit call within the 'function'? It only gets called if the %foobar% variable is equal to 1 (which is always the case, in our example). Also note that we exit with an error code of 1. So, in short, this script should always return an exit code of 1. Now, let's create another batch script which we'll name script_b.bat:

@echo off

call script_a.bat
echo Exit Code = %ERRORLEVEL%

This second script is very simple. All we do is call script_a.bat, and then print its resulting return code. What do you expect the return code to be? One would expect it to be 1, but it's not! Our second script will actually print out Exit Code = 0. Why is this?

The answer lies in the call command. Again, unlike Bash scripts, stand-alone batch files do not create their own context when executed. But if you use the call command, the thing you call does get its own context. How weird is that? So, let's trace the first script we wrote to figure out where the error code gets changed.

After some initial setup, we call our function (call :function). Inside our function, we create a variable, initialize it to 1, then test to see if the value is 1. Since the value is indeed 1, the if test succeeds, and the exit command is called. But we don't exit the script; instead, we exit the context that was created when we called our function. Note that immediately after we call our function, we perform a cd operation. This line of code gets executed, succeeds, and sets the %ERRORLEVEL% global to 0.

In order to exit properly, we have to exit our initial script twice, like this:

@echo off
SETLOCAL

call :function
if "%ERRORLEVEL%" == "1" exit /B 1

cd %SOME_PATH%

goto :functionEnd
:function
    set foobar=1
    if "%foobar%" == "1" exit /B 1
    goto :EOF
:functionEnd

See the new exit call after our initial function call? Then, and only then, will our second script print out what we expected. This subtle behavior stymied me for several hours today; hopefully this short post will help someone else avoid this frustration.

At work, I'm in charge of 20 individual build systems for one of our larger software project (18 Linux systems and 2 Windows systems). Every machine is connected to a private network that cannot see the outside world. As you might expect, the occasional "clock skew" warning would be thrown by gcc, since some of the source files had date stamps in the future. To fix this, I set out to learn about configuring NTP on a private network. As is typical of the Linux world, there was little useful documentation to be found. After gleaning little bits of information from a number of sources, I figured out how to do it, and I'm writing it down for everybody's benefit.

Creating the NTP Master Server

Our first step is to create a 'server' machine from which all of our other machines will get the time. In this tutorial, our master machine is a Linux box. Here's how to set things up:

Step 1: Edit ntp.conf
The first course of action is to edit the ntp.conf file in the /etc directory. Place the following lines in this file, removing any others that may exist (you may want to back up your existing ntp.conf file just in case):
# Use the local clock
server 127.127.1.0 prefer
fudge  127.127.1.0 stratum 10
driftfile /var/lib/ntp/drift
broadcastdelay 0.008

# Give localhost full access rights
restrict 127.0.0.1

# Give machines on our network access to query us
restrict 192.1.1.0 mask 255.255.255.0 nomodify notrap
You'll want to replace the highlighted sections with the private network address range that should be allowed to query this server, along with the corresponding mask, respectively. In this example, any machine on the 192.1.1.xxx network can query the master server for time updates.
Step 2: Restart the NTP daemon
Once the above changes have been made, the NTP daemon needs to be restarted. How to do this unfortunately differs among Linux distributions. Here are a few commands that I figured out for the OS families I care about:
  • RedHat: service ntpd restart
  • SLES 8/9: /etc/init.d/xntpd restart
  • SLES 10: /etc/init.d/ntp restart
Step 3: Configure NTP to start on reboot
Perhaps the most important step in this process is configuring the NTP daemon to start up on a reboot. Here's how to do it:
  • RedHat: chkconfig ntpd on
  • SLES 8/9: chkconfig xntpd on
  • SLES 10: chkconfig ntp on

Configuring the Client Machines

Step 1: Edit ntp.conf
Client machines must also have their ntp.conf file updated (again, in the /etc directory). Place the following lines in the configuration file:
# Point to our network's master time server
server 192.1.1.100

restrict default ignore
restrict 127.0.0.1
restrict 192.1.1.100 mask 255.255.255.255 nomodify notrap noquery

driftfile /var/lib/ntp/drift
Both of the highlighted sections above should point to the master server (in this case, with an IP address of 192.1.1.100).
Step 2: Stop running NTP daemons
Use one of the following to stop any running NTP daemons:
  • RedHat: service ntpd stop
  • SLES 8/9: /etc/init.d/xntpd stop
  • SLES 10: /etc/init.d/ntp stop
Step 3: Force an update
We must force the client to update now, in case the offset is larger than 1000 seconds (the largest offset NTP allows). To do this, issue the following command:
ntpdate -u 192.1.1.100
Again, replace the highlighted section with the IP address of the master server. Note that you may need to do this forced update two or three times to make sure things are synchronized.
Step 4: Start the NTP daemon
Now that we've synced the client, we should restart the daemon:
  • RedHat: service ntpd start
  • SLES 8/9: /etc/init.d/xntpd start
  • SLES 10: /etc/init.d/ntp start
Step 5: Configure NTP to start on reboot
Finally, we need to make sure the daemon starts up at boot time (like we did for the server):
  • RedHat: chkconfig ntpd on
  • SLES 8/9: chkconfig xntpd on
  • SLES 10: chkconfig ntp on

Once you've set this up, all the client machines will keep their clocks synchronized with the master. If you update the master server time, the clients should follow (as long as the update isn't larger than 1000 seconds). I believe you can even point Windows systems to the master, though I have yet to try that.

Google recently enabled "Search Suggest" at their official home page. I find this feature annoying, and I wanted a way to disable it. Thankfully, the solution was very simple:

  1. Visit the Search Preferences page
  2. Set the Query Suggestions option to "Do not provide query suggestions in the search box"
  3. Save your preferences

I wish Google had made disabling this a little clearer, rather than quietly adding the preference to the preferences page.

By default, Windows Explorer opens up in the "My Documents" folder, which is far from useful (assuming you don't store all your documents there). Just today, I figured out how to get Windows Explorer to open in a folder that you specify. Here's how to do it:

  1. Right click the Windows Explorer shortcut and select Properties.
  2. Make sure you are on the "Shortcut" tab.
  3. Clear the Start in: field. Contrary to what you might think, Windows Explorer seems to ignore whatever you type here (which seems stupid to me).
  4. Change the Target: field to the following:
    %SystemRoot%\explorer.exe /n,/e,{Desired_Path}. For example: %SystemRoot%\explorer.exe /n,/e,C:\. Note that the commas are required!
  5. Accept your changes.

Now, each time you open Windows Explorer, it will point to your desired location. This is an incredibly useful tip that will now save me two clicks for every explorer window that I open!

A little over a year ago, I inherited a productivity tool at work that allows users to enter weekly status reports for various products in our division. The tool is web-based and is written entirely in Perl. One of the mangers who uses this tool recently suggested a new feature, and I decided to implement it using cookies. Having never implemented cookies from a programming perspective, I was new to the subject and had to do some research on how to do it in Perl. It turns out to be quite easy, so I figured I would share my newfound knowledge:

Creating a Cookie

Although there are other ways to do this (as always with Perl), this tutorial will be making use of the CGI::Cookie module. It makes creating and reading cookies very easy, which is a good thing. Furthermore, this module ships with virtually all Perl distributions! Here's a chunk of code that creates a cookie:

use CGI qw(:all);

my $cgi = new CGI;
my $cookie = $cgi->cookie(-name => 'my_first_cookie',
                          -value => $someValueToStore,
                          -expires => '+1y',
                          -path => '/');

print $cgi->header(-cookie => $cookie);

I first import all of the CGI modules. This isn't exactly necessary, and it might be a little slower than using the :standard include directive, but I needed a number of sub-modules for the tool I was writing. I then create a new CGI object, and use it to call the cookie() subroutine. This routine takes a number of parameters, but the most important ones are shown.

The -name parameter is simply what you want to name this cookie. You should use something that clearly identifies what the cookie is being used for (though you should always be mindful of the associated security implications). The -value parameter is just that: the value you wish to store in the cookie. I believe cookies have a bounds of around 4K of storage, so remember to limit what you store. Next up is the -expires parameter, which specifies how far into the future (or past) the cookie should expire. The value of '+1y' that we specified in the example above indicates we should expire in one year's time. Values in the past (specified with a minus sign) simply indicate that the cookie should be expired immediately. No value will cause the cookie to expire when the user closes their browser. Finally, the -path parameter indicates for what paths on your site the cookie should apply. A value of '/cgi-bin/' for example will only allow the cookie to work for scripts in the /cgi-bin folder of your site. We specified '/' in our example above, which means the cookie is valid for any path at our site.

Finally we print our CGI header, passing along a -cookie parameter with our cookie variable. As always, the documentation for the CGI module will give you lots more information on what's available.

Reading a Cookie

Reading back the value stored in a cookie is even simpler:

use CGI qw(:all);

my $cgi = new CGI;
my $someValue= $cgi->cookie('my_first_cookie');

Again we create our CGI object, but this time we use it to read our cookie, simply by calling the cookie() routine with the name of the cookie we created before. If the cookie is found, the stored value is read and stored into our variable ($someValue in the example above). If the cookie is not found, a null value is returned.

One Gotcha

In the tool I was working with, I was handling storing and reading the cookie on the same page. Since we have to create our cookie via the header() call, I was concerned about how to handle the case where we weren't creating a cookie. The solution, it turns out, is pretty simple:

use CGI qw(:all);

my $cgi = new CGI;
unless (param())
{
    print $cgiquery->header;
}

In this example, we print out a generic CGI header only if no parameters were passed in (i.e. the user didn't push us either a POST or GET). If we do have parameters, we want to create a cookie, and we'll send the header after we have done so. Pretty easy!

Here's a super great tip I learned from an article at Lifehacker.

My laptop here at work, a Lenovo ThinkPad, has a tremendously loud beep (through headphones, it will nearly blow your ears out). This beep occurs every so often when I'm typing faster than the computer thinks I should, and I end up pressing several keys on the keyboard at once. Thankfully, there's now a way to disable this annoying sound!

To temporarily disable the beep: net stop beep To permanently disable the beep: sc config beep start= disabled

In the latter command, note the space between the equals and the word 'disabled.' I'm not sure if that's necessary or not, but including it worked for me. The space is indeed required (thanks Dustin). I had no idea that a Windows service was responsible for this annoyance!

I recently ran into a problem on my system where all the HTML document icons had been reset to the generic default icon: Default Windows Icon

Apparently, the Minefield build of Firefox had at some point corrupted this icon. I found that I was unable to change or reset the icon through the Folder Options » File Types dialog in Windows Explorer. No matter what I tried, I couldn't restore the icon, and it drove me nuts. Then I figured out what to do, thanks to this forum post at MozillaZine:

  1. Open RegEdit.
  2. Browse to the HKEY_LOCAL_MACHINE\SOFTWARE\Classes\FirefoxHTML registry branch.
  3. Delete the ShellEx\IconHandler registry key entry.
  4. Close RegEdit.
  5. In Windows Explorer, browse to the Documents and Settings\{username}\Local Settings\Application Data folder.
  6. Delete the iconcache.db file. It's hidden, so you may need to tweak your Windows Explorer settings to see it.
  7. Reboot.

Problem solved!

I bought a Linksys WRT54GL today, to replace our aging DLink DI-624 (it had been acting pretty flaky as of late). The Linksys router supports open-source firmware, and our first course of action was to flash the highly recommended DD-WRT distribution. I have to say that I am very impressed with this firmware. There are lots of options available and it reports lots of interesting information.

Setting up the router wasn't difficult, but my dad and I ran into problems getting our IBM laptops connected wirelessly. All of our other machines were able to connect without any problems, so it was clearly a problem with either the ThinkVantage Access Connections application or the IBM wireless adapter. We spent quite a while trying to get things working, and finally found the issue. We had originally set the Wireless Network Mode option in the router basic setup to "G-Only" mode since we intended to use 802.11g only around our house. But for whatever reason, the IBM laptops didn't like that. Switching the option back to "Mixed Mode" cleared up the problem immediately, much to our delight. Hopefully this little tidbit will help out someone else facing the same problem.

A Perl Module Primer

Aug 18, 2007

I've recently been wrangling with some Perl code for a project at work, and have been putting together a Perl module that includes a number of common functions that I need. As such, I had to remind myself how to create a Perl module. During my initial development, I ran into a number of problems, but I eventually worked through all of them. In the hopes of helping myself remember how to do this, and to help any other burgeoning Perl developers, I've written the following little guide. Hopefully it will help shed some light on this subject.

Let me preface this guide with two important statements:

  1. I'm not aiming to show you how to create a module for distribution. Most of the other tutorials cover that topic in depth.
  2. I am going to assume that you have a working knowledge of Perl.

To start, let's take a look at our sample module:

package MyPackage;
use strict;
use warnings;

require Exporter;
our @ISA = ("Exporter");

our %EXPORT_TAGS = ( 'all' => [ qw(sayHello whoAreYou $firstName
    %hashTable @myArray) ] );
our @EXPORT_OK = (@{ $EXPORT_TAGS{'all'} });
our @EXPORT = qw();

our $firstName = "Jonah";
our $lastName = "Bishop";

our %hashTable = { a => "apple", b => "bird", c => "car" };
our @myArray = ("Monday", "Tuesday", "Wednesday");

sub sayHello
{
    print "Hello World!\n";
}

sub whoAreYou
{
    print "My name is $firstName $lastName\n";
}

1;

We start out by declaring our package name with the package keyword. Special Note: If you intend on having multiple modules, and you use the double colon (::) separator, you're going to need to set up your directory structure correspondingly. For example, if I had two modules, one named Jonah::ModuleOne and another named Jonah::ModuleTwo, I would need to have a folder named Jonah, inside of which would live the code to my two modules.

I next enable the strict and warnings pragmas, since that's good programming practice. Lines 5 and 6 are standard to virtually all Perl modules. First, we require inclusion of the standard Exporter module, then we indicate that our module inherits from said Exporter (the @ISA (is a) array is what sets this).

Line 8 is where things get interesting. We need to specify what symbols we want to export from this module. There are a number of ways of doing this, but I have chosen to use the EXPORT_TAGS hash. Special Note: This is a hash, not an array! I recently spent about an hour trying to debug a strange error message, and it all stemmed from the fact that I had accidentally created this as an array.

The EXPORT_TAGS hash gives us a means of grouping our symbols together. We essentially associate a label with a group of symbols, which makes it easy to selectively choose what you want to import when using the module. In this example, I simply have a tag named 'all' which, as you might guess, allows me to import all of the specified symbols I provide in the associated qw() list. Note that you must precede exported variable names with their appropriate character: $ for scalars, @ for arrays, and % for hashes. Exported subroutines don't need to have the preceding & character, but it doesn't hurt if you put it there.

Line 10 shows the EXPORT_OK array. This array specifies the symbols that are allowed to be requested by the user. I have placed the EXPORT_TAGS{'all'} value here for exporting. I will show how to import this symbol into a script in just a moment. Line 11 is the EXPORT array, which specifies the symbols that are exported by default. Note that I don't export anything by default. Special Note: It is good programming practice to not export anything by default; the user should specifically ask for their desired symbols when they import your package.

Lines 13 through 27 should be self explanatory. We set up two scalar variables, $firstName and $lastName, as well as a hash table and an array. Note that we precede all variables with the our declaration, which puts this variable into the global scope for the given context. Since we're using the strict pragma, we need these our declarations; otherwise we'd get some compilation errors.

Line 29 is very important and can easily be forgotten. When a Perl module is loaded via a use statement, the compiler expects the last statement to produce a true value when executed. This particular line ensures that this is always the case.

Now that we've taken a look at the module, let's take a look at a script that uses it:

#!/usr/bin/perl
use strict;
use warnings;
use MyPackage qw(:all);

sayHello();
whoAreYou();

print "$lastName\n"; # WRONG!
print $MyPackage::lastName . "\n"; # RIGHT!

Most of this should be pretty clear. Note, however, how we import the module on line 4. We do the typical use MyPackage statement, but we also include the symbols we want to import. Since we didn't export anything by default, the user has to explicitly ask for the desired symbols. All we exported was a tag name, so we specify it here. Note the preceding colon! When you are importing a tag symbol, it must be preceded by a single colon. This too caused me a great deal of frustration, and it's a subtlety that's easily missed.

One other interesting note: on line 9, we try to print the $lastName variable. Since we never exported that particular variable in our module, referencing it by name only will result in an error. The correct way to access the variable, even though it wasn't exported, is shown on line 9. You must fully qualify non-exported symbols!

Hopefully this quick little guide has made things a little clearer for you. If for no other reason, it will help me remember these subtleties of Perl programming. :-)
I was touching up some of my photographs recently when I noticed that one shot in particular had substantial vignetting. Wishing to use this photograph as a desktop wallpaper, I set out to try and remove this effect from the photograph. All of the standard Photoshop tools failed to do the trick. Both the clone tool and healing tool produced poor results. Disappointed, I searched the web for help. Thankfully, I found the answer I was looking for: a new filter introduced in Photoshop CS2.

For the sake of discussion purposes, here is the original, unedited image (scaled down of course):

Original, unedited photo; note the strong vignetting in the corners

The vignetting in this image is most apparent in the upper left and right corners. In order to fix this unwanted effect, I fired up the new Lens Correction filter made available in Photoshop CS2 (it's under the Filter » Distortion menu).

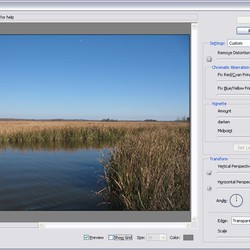
The Lens Correction filter window

This particular filter allows you to alter a number of things: chromatic aberration, vignetting, and perspective problems. Two sliders for tweaking vignetting are available along the right hand side of the filter; one handles the amount of correction desired (either lighter or darker), while the other handles the midpoint (which I still don't fully understand; a trip through the documentation is in order). I lightened the corners by a value of +18, which gave me the following result:

An updated version of the original, without vignetting

As you can see, the results are stunning. Not only was the vignetting removed from the upper corners (where it is most apparent), the lower corners were also updated, as were the edges of the photo. After tweaking the levels of this photo, the final result is definitely desktop wallpaper worthy:

The final version with improved levels and no vignetting

This new filter is fairly well hidden, like many of Photoshop's features, but I'm glad that I stumbled upon it. I was definitely impressed with the results, and I have yet one more trick in my bag for future photo editing.

I recently installed Apple iTunes for the first time (the QuickTime install on my laptop was having lots of problems). One of the first things I tried out was subscribing to a video podcast (specifically The Totally Rad Show), which was fairly easy to do. As soon as I started to play the latest episode, I noted that playback performance was horrible. I never had this kind of performance problem with QuickTime, so I was a little surprised that iTunes would be so different.

A quick Google search turned up a support article from Apple on iTunes performance in Windows XP and 2000. All of the standard suggestions are there (make sure you're computer is fast enough, download the latest version, etc.), but one suggestion caught my eye: "Disable Direct3D video acceleration in QuickTime."

I ventured to the Windows Control Panel, opened the QuickTime item, and turned off the Direct3D video acceleration. To my surprise, performance was restored! Who knew that a simple toggle could solve such an annoying problem?

In loosely related news, I'm getting closer to actually buying an iPod (something I thought I'd never do). More on this later.

You don't know the power of the Dark Side; I must obey my master. — Darth Vader

MozillaZine has announced that Firefox 2.0.0.5 has been released (though, as of this writing, I still don't see it via auto-update). I enjoy looking through change logs (weird as that may seem), so for every new Firefox release, I take a look at Bugzilla to figure out what has been fixed and what is new. Here's how I do it:

  1. Browse to the BugZilla keywords description page (the link to this page is also available on the advanced search form).
  2. Look for the "fixed[versionNumberHere]" and "verified[versionNumberHere]" keywords. Note that the [versionNumberHere] bit refers to the Gecko version number, not the Firefox version number. For example, Firefox 2.0.0.5 uses Gecko version 1.8.1.5 (as you might guess, the 2.0 release used 1.8.1). Firefox 3 will use Gecko 1.9.
  3. Out to the right of each keyword, you should see a count of the total bugs that particular keyword corresponds to. Click that number, and you will see all of the bugs that use the specified keyword.

Here are the fixed bugs and verified bugs for 2.0.0.5. If you really want to get clever, you can combine these keywords together (separated by a comma) on the advanced BugZilla search page. You'll need to tweak some of the default settings on that form to get it to work, but it can be done (as this query for Firefox 1.5.0.5 indicates).

There are two special notes about doing things this way:

  1. These queries are looking at fixes in the Gecko engine. As such, bug fixes for Thunderbird and Seamonkey will also show up.
  2. You may not see everything, particularly high-risk security fixes. For all security changes, see the known vulnerabilities page.

I've come across a few articles on how to optimize WordPress performance (all of the following links come from the first linked story in the list below):

WordPress is by far my favorite content management system, but I opted to use Movable Type over at Born Geek, mainly because it uses static HTML pages (which load faster). Considering the content in the above guides, I may eventually switch from Movable Type to WordPress.

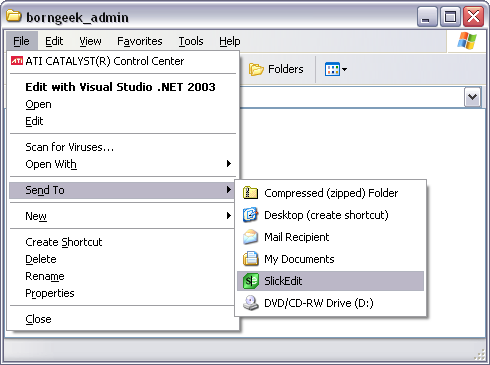
Taking a screenshot of an application is a simple task: the "Print Screen" key can be used alone (to grab the entire screen), or one can use the "Alt + Print Screen" key combination to take a snapshot of only the active window. But taking a screenshot of the active window, while an application menu is opened, is a little tougher. Sure you could use a third-party solution to do it, but suppose you don't want to (or cannot) use such a tool. What is one to do?

One option, which isn't very appealing, is to take a screenshot of the entire screen (using the "Print Screen" key) and then crop out the active window using some image editor. Again, this involves using a third-party application to do the cropping (although Microsoft Paint can be used to some minimal effect).

The better answer, as I accidentally discovered myself, is very simple. Any application worth its salt uses keyboard accelerators (access keys, to be exact) to allow keyboard users to access application menus. The problem is that most applications make use of the "Alt" key to invoke these access keys. For example, "Alt + F" in Windows Explorer will open the File menu. Suppose I want to take a screenshot of a highlighted menu item within the File menu. If I open the menu and press "Alt + Print Screen" to take the screenshot, the menu is dismissed, since the application thinks I'm trying to invoke another menu. But we can work around this limitation!

  1. Hold the Alt key down and press the corresponding access key to open the desired menu.
  2. Keep the Alt key pressed!
  3. Move the menu selection (using the arrow keys on the keyboard) to the desired menu item.
  4. Press the Print Screen key.

Voila! An active-window screenshot with a highlighted menu item, using no third-party application. Here's an example:

While working on my photo album software, I ran into an interesting SQL problem. I wanted to be able to display information about my photo albums, along with the number of images in each album. The problem is that my data is broken up into two tables: an albums table and an images table. My goal was to use exactly one SQL query to access all of the data, including the count of images. And I wanted empty albums (no images) to also show up in the query's results. But try as I might, I couldn't get the query to return the data I wanted. I finally found a solution that works, and I present an example below.

Let's suppose we have two MySQL tables: one that represents directories, and another that represents files. The directories table has the following columns:

  • ID
  • Name

And the files table has the following columns:

  • ID
  • Parent_ID
  • Name

The Parent_ID field in the files table corresponds to the ID field in the directories table. In order to select both the count of files in each directory, as well as all of the directory information, we do a simple join. But here's the trick: the order of your tables matters! Here's the query that works for this scenario:

SELECT d.*, Count(f.ID) AS Count FROM directories d LEFT JOIN files f ON f.Parent_ID = d.ID GROUP BY d.ID

When the tables are reversed in the JOIN, only tables with 1 or more entries show up in the results. What a subtle change! Hopefully someone will find this tip useful. It sure took me a while to get this working.

Here's a handy tip for all you WordPress 2.x users out there. The inline uploading feature of the "Write Post" administration page was completely useless to me. I never have, nor will I ever, upload files to my web server using the WordPress interface (that's what we have SCP and SFTP for). What irritated me most, however, was that I couldn't turn this feature off, thereby hiding the iframe that contained the uploading controls. It took up a large amount of space on the admin page, and it looked ugly. But I've figured out how to "disable" it. Here's what I did:

In the wp-admin/ folder, I opened up the file named edit-form-advanced.php. Doing a search for the word upload yielded a block of code controlled by the following conditional expression:

if(current_user_can('upload_files'))

I simply commented out this block (including the conditional) with some c-style comments. I did the exact same thing for the edit-page-form.php file. VoilĂ : no more inline upload! I'm so glad I've been able to reclaim that wasted screen real estate.

After graduating from school with a bachelor's degree of computer science, I must admit that I knew virtually nothing about developing *NIX based applications (that's UNIX / Linux based applications for the non-geeks out there). Granted, I did do a little bit of non-Windows based programming while in school, but it was always incredibly basic stuff: compiling one or two source files, or occasionally writing a make-file for larger projects (three or four source files). Having never had a Linux or UNIX box to play with outside of school, I just never got a chance to get my feet wet. Thankfully, my job at IBM has changed that.

Over the past few weeks, I've been doing a great deal of Linux programming, thanks to the cross-"platformedness" of one of the projects I'm working on. And this project is way more complicated than your typical school assignment. I'm now horsing around dynamically linked libraries, also known as "shared objects" in Linux land, like nobody's business. Not only that, the project itself is essentially a multi-threaded shared object, making it all the more exciting. I've learned more about g++, ld, and ldd in the past few weeks than I ever knew before.

Unfortunately, debugging multi-threaded shared objects is easier said than done. The debugging tools in Linux (at least the ones I've played with) all suck so horribly. They make you really appreciate the level of quality in Microsoft's Visual Studio debugger, or better yet, in WinDBG (this thing is hard core, and it's what the MS developers actually use in practice). Fortunately, printf() always saves the day.

One cool trick I recently employed to debug a library loading problem I was having, is the LD_DEBUG environment variable. If you set LD_DEBUG to a value of versions, the Linux dynamic linker will print all of the version dependencies for each library used for a given command. If you have a Linux box, try it out. Set the LD_DEBUG environment variable, then do an ls. You'll be amazed at the number of libraries that such a simple command involves.

Although Linux development can be frustrating at times, I've already learned a great deal and consider my experiences a great success. If I come across any more useful tips (like LD_DEBUG above), I'll try my best to post them here (as much for my sake as for yours). Until then, you'll find me knee-deep in my Linux code. I've got a few more bugs to squash.

Here's a small but handy Firefox tip for "safekeeping" your bookmarks. It also lets you share your bookmarks across multiple profiles!

  1. Navigate to your Firefox profile directory. On Windows, this is usually located somewhere similar to the following: C:\Documents and Settings\<username>\Application Data\Mozilla\Firefox\Profiles\
  2. Copy your bookmarks.html file and paste it in a safe location elsewhere on your hard drive.
  3. Back in your profile directory, create a text file called user.js (if one does not already exist). Open the file for editing in your favorite text editor (avoid word processors like Microsoft Word).
  4. Add the following line of text to this file, changing the path to the appropriate location (wherever you copied your bookmarks to earlier): user_pref("browser.bookmarks.file", "C:\Path to Bookmarks File\bookmarks.html");
  5. Save the file and restart your browser!

You can use this trick in multiple profiles, allowing them to all point to the same bookmarks file. Additionally, it helps to safeguard against possibly losing your bookmarks if your profile becomes corrupt.

The "Open Command Window Here" power toy for Windows XP is an excellent tool that I use all the time. I run Windows 2000 at work, however, so I don't have access to this excellent computer aid. But I recently found this article, which discusses how to add the feature to any flavor of Windows. Method number 3 was my preferred choice, and I will reproduce the steps I took below.

  1. In Windows Explorer, open the Tools » Folder Options menu item.
  2. Select the File Types tab.
  3. Press the letter 'n' on your keyboard to scroll to the N/A section.
  4. Select the entry labeled Folder.
  5. Click the Advanced button.
  6. Click the New button.
  7. In the action field, type "Command Prompt" (without the quotes).
  8. In the application field, type "cmd.exe" (without the quotes).
  9. Save all your changes (click OK on each dialog) and exit the Folder Options dialog.

Once you perform the above steps, you'll be able to right click a folder and select the "Command Prompt" menu item to open a command window. How cool is that?